hexo+github的个人博客搭建
一,环境的安装
我搭建的平台是为liunx系统,因此我们需要安装的环境可以用yum install + 软件名进行安装
我们需要安装的环境有git,node(node提供npm对模块下载等,温馨提示:不能使用yum去安装node,需要去官网安装新的版本,不然下面生成静态网页会报错)
1.从官网下下载最新的nodejs
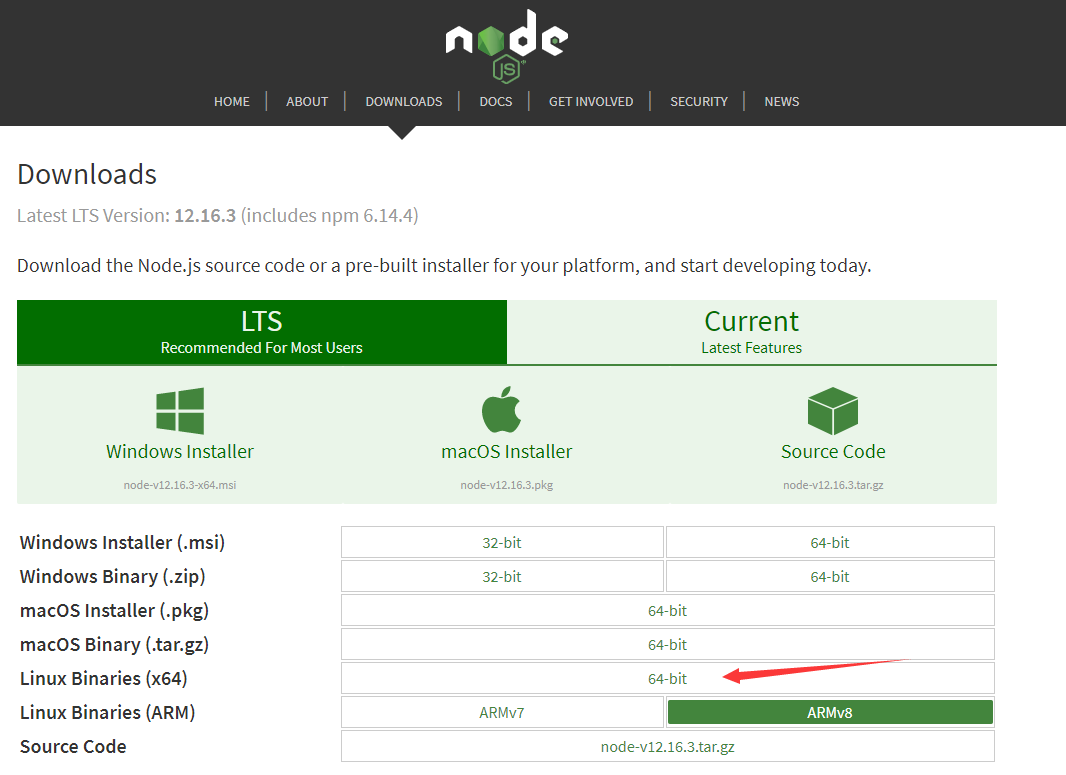
2、通过ftp工具上传到linux服务,解压安装包
tar -xvf node-v12.16.3-linux-x64.tar.xz
3.添加环境环境变量
node -v #查看node版本
npm -v #查看npm版本
npm install -g cnpm - -registry=http://registry.npm.taobao.org #安装淘宝的cnpm 管理器
cnpm -v #查看cnpm版本
cnpm install -g hexo-cli #安装hexo框架
hexo -v #查看hexo版本
mkdir blog #创建blog目录
cd blog #进入blog目录
sudo hexo init #生成博客 初始化博客
hexo s #启动本地博客服务
http://localhost:4000/ #本地访问地址
hexo n “我的第一篇文章” #创建新的文章
返回blog目录
hexo clean #清理
hexo g #生成
Github创建一个新的仓库 YourGithubName.github.io
##想麻烦可以用简单的脚本安装
1 |
|
cnpm install –save hexo-deployer-git #在blog目录下安装git部署插件
配置_config.yml
Deployment
Docs: https://hexo.io/docs/deployment.html
deploy:
type: git
repo: https://github.com/YourGithubName/YourGithubName.github.io.git
branch: master
去GitHub配置秘钥
hexo d #部署到Github仓库里
https://YourGithubName.github.io/ #访问这个地址可以查看博客
git clone https://github.com/litten/hexo-theme-yilia.git themes/yilia #下载yilia主题到本地
修改hexo根目录下的 _config.yml 文件 : theme: yilia
hexo c #清理一下
hexo g #生成
hexo d #部署到远程Github仓库
https://YourGithubName.github.io/ #查看博客
Hexo+NexT主题中添加网页音乐播放器功能
1.下载Aplayer
点击访问 Aplayer 源码:GitHub Aplayer。
https://links.jianshu.com/go?to=https%3A%2F%2Fgithub.com%2FMoePlayer%2FAPlayer
下载到本地,解压后将dist文件夹复制到themes\next\source文件夹下。
2.配置music.js
新建themes\next\source\dist\music.js文件,添加内容:
1 | const ap = new APlayer({ |
源码中对应的参数解释,这边都有: Aplayer 中文文档:https://aplayer.js.org/#/zh-Hans/
audio 对应的便是音频文件,所以音乐播放器需要播放的音乐是需要自己进行相关信息(如歌曲链接、歌词、封面等)的配置。
推荐使用音乐外链网站获取:http://music.xf1433.com/
3.添加_layout.swig
1 | 打开themes\next\layout\_layout.swig文件,将 |
添加到<body itemscope …>后面就行,即在
里面。重新生成,访问页面,就能看到左下角的音乐播放器了。
Hexo next 主题配置右侧栏的分类和标签打开的是空白
1. 新建 标签 和分类 页面
只要在 source 文件夹下新建.md文件,并且文章前面按如下格式表明所属分类和标签就行:
title: 自学编程成功概率有多少可能
date: 2017-05-26 19:57:47
tags: [编程,感悟]
categories: 技术
先根目录输入命令 hexo new page categories 会自动新建 categorier 文件夹并生成一个index.md文件,里面的代码为:
title: categories
date: 2019-01-30 23:10:51
同理,「标签」也一样 hexo new page tags 生成 tags 文件夹,其中会自动生成一个index.md文件,代码为:
title: tags
date: 2019-01-30 23:14:51
2. 开始配置菜单,如「首页」、「分类」、「标签」等这些菜单
主题文件下的_config.yml
menu:
home: / || home
about: /about/ || user
archives: /archives/ || archive
tags: /tags/ || tags
categories: /categories/ || th
schedule: /schedule/ || calendar
sitemap: /sitemap.xml || sitemap
commonweal: /404/ || heartbeat
Enable/Disable menu icons. #菜单图标
menu_icons:
enable: true
然后跑去 language 文件夹 zh-Hans.yml 修改中文名字,菜单就以中文显示了。
menu:
home: 首 页
archives: 归 档
categories: 分 类
schedule: 日程表
sitemap: 站点地图
tags: 标 签
about: 关于博主
search: 站内搜索
top: 最受欢迎
commonweal: 公益404
我们发表文章使用「tags」「categories」只需在文章开头添加如下代码:
title: 利用GitHub和HEXO免费搭建个人博客高级 美化篇
date: 2019-01-29 22:58:56
tags: [hexo建站,hexo部署,github部署,个人博客] #添加的标签
categories: hexo博客 #添加的分类
如此即可在菜单栏里的「tags」「categories」看见相应的效果。但是实际上打开是空白页面 本文的重点来了。
小tips:每次的手输入 categories 我们可以在D:\blog\scaffolds\post.md 添加如下代码,这样每次新建文章,就自动有了。
title: 我的第一个博客文章
date: 1590374214000
tags: #新加
categories: #新加
3. Hexo next 主题配置右侧栏的分类和标签打开的是空白
先前 categorier 文件夹(D:\blog\source\categories),里面的 index.md 文件打开,修改(即添加一行)为:
title: categories
date: 2018-01-23 17:14:51
type: “categories” #新添加的
同理,「标签」
title: tags
date: 2018-01-23 17:14:51
type: “tags” #新添加的
保存效果为:
tags
4. 插播友链的设置方法
主题文件里,就在设置 menu 菜单的下面:
social: #友链地址
GitHub:
E-Mail:
简书:
QQ:
social_icons: #友链图标
enable: true
icons_only: false
transition: false